CoreFighter was an integral part of the Federation's force (E.S.F.S). The fighter itself could transform from plane mode into a roughly rectangular block, in which it formed an interchangeable torso module for the RX-78 Gundam, RX-77 Guncannon and RX-75 Guntank. It's primary purpose was to protect the combat data from the Gundam's learning computer system, serving as an escape vehicle in the advent of the mobile suit being disabled or destroyed. In addition, it was armed with four 25 mm machine guns mounted in the nose, and two small missile launchers mounted on the fuselage, and was capable of engaging alone as a low/mid-altitude light air superiority fighter. With thrust vectoring and VTOL ability, the Core Fighter also operated as a fast reconnaissance aircraft for large carrier ships such as the White Base (one of the E.S.F.S mothership).
Scale modeling information :-
Model type : Master Grade - RX-75 Guntank Corefighter ver.2.0
Scale : 1 / 100 mm
Project : Conversion
Medium : Lacquered paint / pastel - manual
Work in progress :-
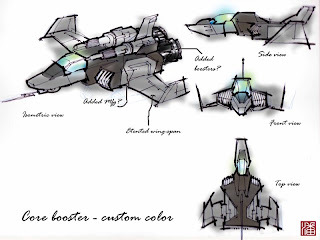
Preliminary stage - Drafted out the entire design which need to be 'mod' (modification). Additional parts and color scheme were taken into account before physical works begin. Existing color scheme is 'ridiculously' contrasting; consist of Red, Blue and White! Therefore, a new 'military' color scheme was replaced for this project purpose.
Preliminary stage - Snap-fitted the whole kit. As for seen the 'ridiculous' color scheme were so obvious!
Stage 1 - Attached 1.0mm pla-plate at rear side to received new set of boosters. Rest of the existing parts were physically detached for further 'mod' progress. As for new sets of boosters, adhere with the parts were used:
- Plastic glue caps
- Round tubular plaplates
Stage 2 - Additional 'Koto'(kotobukiya) parts were located accordingly for minor detailing on body part. Detached 'wings' to be lengthen with 1.0mm pla-plates to achieve new span.
Stage 3 - Improved to a new wing span. In addition with some simple scribed panel lines to enhance some detailing.
Stage 4 - Apply primary color as 'based-coat' accordingly to preliminary sketches. Lacquered paint were used :-
- Mr. Color - German Grey (40)
- Mr. Color - Light Grey (pre-mixed)
- Mr. Color - Burnt Iron (61)
Stage 5 - Using sand paper 1000 to achieve 'traction' effect randomly on kit edges. Following up with brush-stipple effect for 'rust' respectively.
Lacquered paint used :-
- Mr. Color - Red Brown (41)
Stage 6 - Pastel were applied to soften up all 'stiffed' brush effect and 'traction' marks. Additional pastel effect on rustic part were subsequently applied. Pastels were used :-
- Tamiya weathering master - Gray
- Tamiya weathering master - Orange rust
Stage 7 - Reapply 'rust' effect on desired area for realism. At this stage, lacquer were thinned and stippled at random pace.Lacquered paint used :-
- Mr. Color - Red Brown (41)
Stage 8 - Intact with cockpit and rear spoiler..(not sure what's the correct terms for the red color thingy!). Some minor add-on to spice up the whole kit. Adhere with the part used :-
- Needles as for 'stabilizers'
- Koto(Kotobukiya) parts as for ' beam cannon'
Stage 9 - Final stage to apply clear part at bottom part as kit base. Adhere with the part used :-
- Additional needle as for 'aerial'
- Stretch sprue as for 'balancer' (yet not sure the correct terms!)
Stage 10 - Retouch as necessary before applying 'water-slides' decal and procedure of final coat.


 S
S


No comments:
Post a Comment